In 1918, a series of major German and Allied offensives broke the stalemate of trench warfare on the Western Front, resulting in the near-collapse of the German Army and the end of the fighting before the end of the year.
Key dates - 1918
- 21 March: Germans launch spring offensive
- 24 March: NZ Division move from Ypres to Somme to fill gap in British line
- 7-29 April: NZ units involved in the Battle of the Lys
- 29 August: NZ Division enters Bapaume
- 29 September-1 October: NZers help break through Hindenburg Line
- 4 November: NZ troops capture Le Quesnoy
- 11 November: Armistice signed with Germany
- 20 December: NZ Division begins occupation duties in Cologne
New Zealand units played their part in the Allies’ final push for victory, helping to breach the main German defence system – the Hindenburg Line – and capturing the walled town of Le Quesnoy during the last weeks of the war.
At the beginning of 1918, events had seemed to be turning the war in Germany’s favour. The collapse of Russia’s resistance during 1917 and the Russian decision, following the Bolshevik revolution in November, to seek an armistice dramatically altered the strategic situation.
The Germans were able to transfer nearly 50 divisions to the Western Front. With its forces greatly bolstered by this influx, the German high command launched a massive offensive with the goal of ending the war before the full might of the United States (which had entered the war in April 1917) could be brought to bear against Germany.
German spring offensive
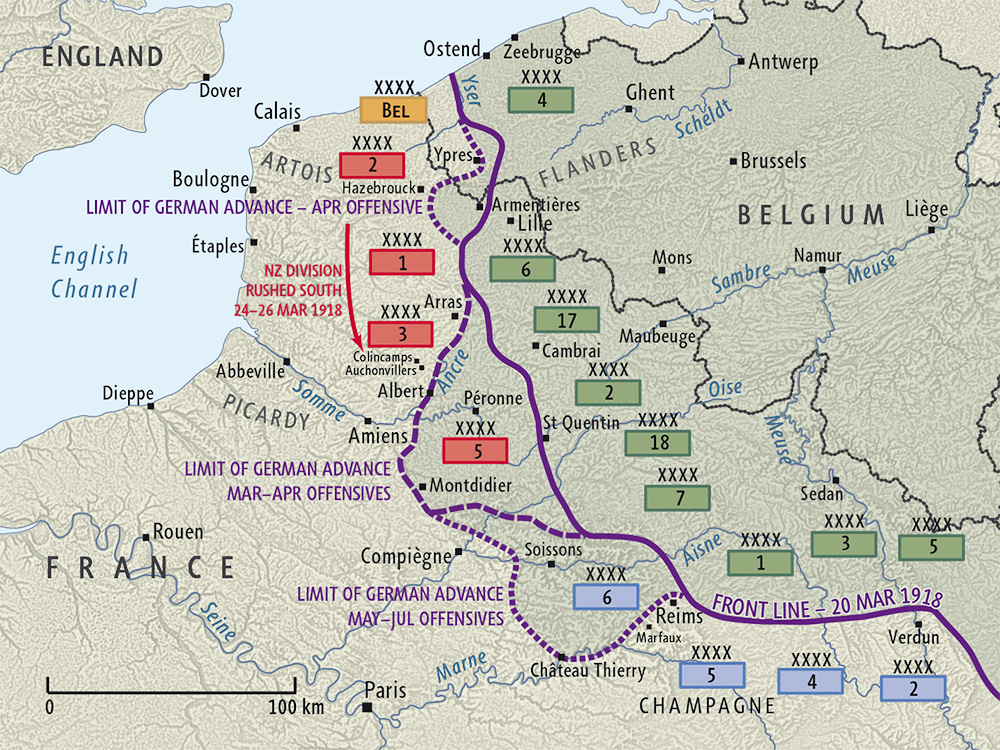
German 1918 spring offensives map (Geographx)
The German spring offensive, which began on 21 March 1918, created the biggest crisis of the war for the Allies. General Erich Ludendorff was the driving force in the preparation of this onslaught, despite his position subordinate to the nominal commander, Field Marshal Paul von Hindenburg. Essentially an opportunist, Ludendorff envisaged breaking through the Allied lines in the Somme area, after which he would determine the next move in light of the new situation created. But his general intention was to swing north and roll up the British front. As would become apparent, such an approach was self-defeating because maintaining momentum depended upon logistic support of the advancing forces, which could only be ensured by careful preparations in advance.
In Operation Michael, 60 German divisions from three armies would attack along an 80-km front between St Quentin and Arras. The British lines would be subject to a hurricane bombardment by a huge mass of guns brought up in secret. Then specially trained storm troops would advance, aiming to penetrate the battered defences. These troops, drawn from various units, formed assault divisions, leaving the rest as less capable ‘trench’ divisions, which would follow up.
When the assault began on 21 March, the Third Army’s resolute defence blunted the thrust at Arras. But further south, against the weaker British Fifth Army, the Germans succeeded in dislocating the British front. The Fifth Army fell back in some disarray, although without collapsing, forcing withdrawals further north.
The German breakthrough had two important effects. First, Ludendorff was drawn away from his main thrust to the sector of what had been a supporting army. He hoped to split the British and French, but his troops were driving into an area that had no targets of vital significance to the Allies. Amiens, a vital communications hub for the British effort, did not at first attract Ludendorff’s attention.
Second, the crisis galvanised the Allies to better coordinate their effort. They agreed to give the French General Ferdinand Foch overall command. The American authorities also placed several of their divisions under temporary British and French command, and two French armies moved forward to help defend the Somme.
New Zealand involvement
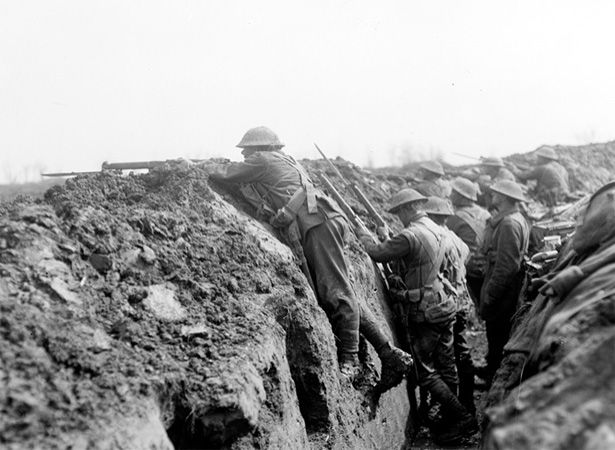
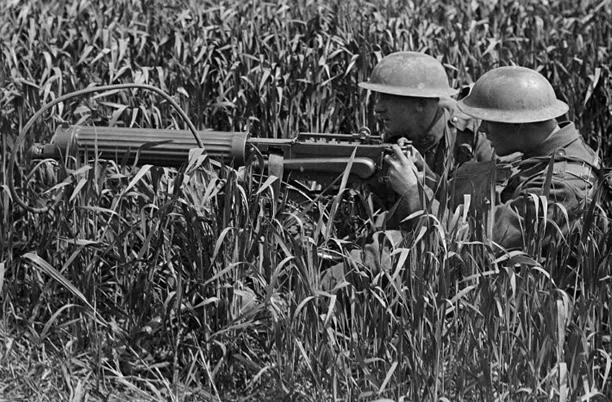
New Zealand troops in the front line near La Signy Farm, April 1918 (ATL, 1/2-013092-G)
The New Zealand Division, recovering in northern France after a difficult winter in the Ypres Salient, was among forces rushed south to the Somme. It began moving by train on 24 March. Attached to General Sir Julian Byng’s Third Army, the New Zealanders became part of Sir George Harper’s IV Corps, with which they would serve for the rest of the war. Sent forward to Hédauville in the Ancre Valley to fill an apparent 7-km gap between Hamel and Hébuterne, they moved into position just as the Germans mounted a new drive towards Doullens.
Change of name
In January 1918, II Anzac Corps was renamed XXII Corps to reflect the changed composition of the force. With the creation of the Australian Corps, the only ‘Anzac’ division left in II Anzac Corps was the New Zealand Division. As all the other divisions were British, it made sense to redesignate it as a British corps. The New Zealand Division only remained in XXII Corps until the end of March, when it went south to the Somme. Despite the absence of Australian and New Zealand infantry divisions, Anzac mounted and cyclist units continued to operate in XXII Corps until the end of the war.
Operating in part of the Somme battlefield of 1916, the New Zealanders, with considerable British help, managed to stabilise the front in this sector. On 26 March two composite brigades pushed forward until they clashed with the advancing enemy formations between Auchonvillers and Hamel; next morning another composite brigade moved into position between Colincamps and Hébuterne. During the 27th, they repelled a series of German attacks. By this time, Operation Michael, now into its seventh day, was running out of steam as German losses mounted. Their artillery struggled to keep pace with the advancing infantry, and discipline suffered as troops looted British supply depots.
Len Coley [Collins], a private in 2nd Battalion, Wellington Regiment, left a description of the fighting on 27 March:
As dawn broke ... we passed through and halted just outside the village of Colincamps. We were warned that Fritz was in the vicinity. Our scouts headed out to have a look. The rest of us prepared for a short stop while our officers palavered on the situation. The stop was too short. The scouts were back quickly. The Germans were marching along the road, half a mile away, towards us.
The skipper gave us orders to stand by. He then spoke those words that make any soldier face hell 10 times over and never think of saying die.
‘Well, boys, it’s up to us. There’s no one behind us for miles – but there soon will be.’
We all knew this was bluff as other troops were days away, but the skipper continued.
‘I want this crowd stopped here, right here, and knowing you, I have faith in you. Now go to it.’ No more orders were necessary. We all knew what was required. Like clockwork, we fell into extended battle order. We waited just inside the cover of the trees for that word which would take us back into action. Our platoon officer lay beside me. I knew what that meant. I could now see the Germans, less than 300 yards away. They were coming towards us in great style and pace.
The officer said in my ear, ‘Sonny, you can start the ball. Fire.’
Gavin McLean, Ian McGibbon and Kynan Gentry (eds), The Penguin book of New Zealanders at war, Penguin, 2009, p. 209
Even as the New Zealanders entered the line, Ludendorff was preparing a mighty blow (Operation Mars) 20 km to the north, at Arras. This attempt to force the issue on 28 March — described by one historian as the single most important day of the campaign — was defeated. Ludendorff’s attention then turned to a new offensive (Operation Georgette) being planned for the Armentières sector. But he allowed operations against Amiens, now belatedly regarded as a key objective, to continue for a few more days. British and Australian troops repelled an attack on 4 April. Next day, a further blow was struck in the Colincamps sector. This would be the only time that the New Zealand Division faced a major set-piece attack. Although the Germans drove the New Zealanders out of La Signy Farm, the assault was easily brought to a halt.
The New Zealanders congratulated themselves on saving Amiens, though the objective of the enemy troops facing them had in fact been Doullens, with the aim of getting behind Arras. The New Zealand Division’s 10-day effort had cost some 2400 casualties, including more than 500 dead.
Operation Michael: the cost
During Operation Michael, the Germans occupied more than 300 sq km of territory – at a cost of 250,000 casualties. The BEF suffered 177,000 casualties (many of them prisoners of war), while the French lost 77,000 men killed, wounded or captured.
The New Zealand Division remained in the Ancre Valley on the Somme until it was relieved in early June. After a period in reserve, the division went back into the line on 2 July, occupying trenches in front of Hébuterne and, further north, facing Rossignol Wood. They spent the next few weeks carrying out aggressive patrolling and fighting small actions to improve their tactical position. With the battlefield in this sector criss-crossed by trenches of the 1916 front line, there were plenty of opportunities for scouting and raiding. Dick Travis, the division’s ‘king of scouts’, was in his element until he was killed by an exploding shell in late July. The New Zealanders so harassed their opponents that the Germans eventually abandoned Rossignol Wood.
The German Army launched four more offensives between April and July. In Flanders, Operation Georgette (9–29 April) pushed the British out of Passchendaele and Messines, territory won at such cost the previous year, but failed to capture the important Hazebrouck rail hub. New Zealand units were involved here too, helping stop the German advance in the Battle of the Lys. New Zealand gunners of the New Zealand Field Artillery’s 2nd (Army) Brigade fought valiantly to support defending troops near Messines. Mounted rifles, cyclist, entrenching and employment company troops from Lieutenant-General Sir Alexander Godley’s XXII Corps were also involved. They filled crucial gaps in the line south-east of Ypres, fighting as de facto infantrymen at ‘Shrewsbury Forest’ (near Hill 60), Méteren, Mt Kemmel, Vierstraat Road and Hill 44 before being withdrawn. At Méteren 210 men of the 2nd New Zealand Entrenching Battalion were taken prisoner — the largest group captured during the whole campaign — when the enemy got behind them.
A further attack on the River Aisne at the end of May (Operation Blücher) netted the Germans another 40 km, but their strategic aims remained beyond their grasp. Each advance only stretched their dwindling resources. German factories, starved of materials by the Allied naval blockade, struggled to replace the weapons and equipment that had been lost. Between March and July, the German Army lost a million men killed or wounded, including many irreplaceable experienced and elite soldiers. In desperation, the German authorities began sending 17-year-old conscripts to the front.
The Allies were also close to exhausting their available manpower, but had the reassurance of growing American support as the US presence on the front expanded. Unlike the Germans, they were also able to keep increasing the firepower of their artillery and infantry. Artillerymen now accounted for more than a third of the BEF’s total strength on the ground. Infantry units’ striking power grew as mortars, machine guns and grenades flowed to the front in ever-increasing numbers. The British Tank Corps, formed in July 1917, continued to expand, as did the Royal Air Force (formed by amalgamating the previous air services in April 1918) and the French Aéronautique Militaire. The Germans could not match this combination of forces.
The last German offensives (Operations Gneisenau and Marneshutz–Reims) in June–July failed. The latter, later dubbed the Second Battle of the Marne, was notable for a devastating counter-attack by the French Tenth Army, supported by American and British forces, which threw the Germans off-balance. Godley’s XXII Corps, redeployed to the Champagne region, took part in these operations attached to the French Fifth Army. New Zealand cyclists distinguished themselves by capturing the village of Marfaux on 22 July. This Allied counter-thrust indicated that Ludendorff had lost the initiative, a perception that would soon be confirmed in dramatic fashion.
On 8 August, the British Fourth Army struck a powerful blow (the Battle of Amiens). A carefully prepared attack by Australian and Canadian troops, with British support, won a stunning victory, capturing 50,000 Germans and 500 field guns. These huge losses prompted Ludendorff to label the first day of the battle the ‘Black Day of the German Army’.
The Allies hit back: Second Marne and Bapaume
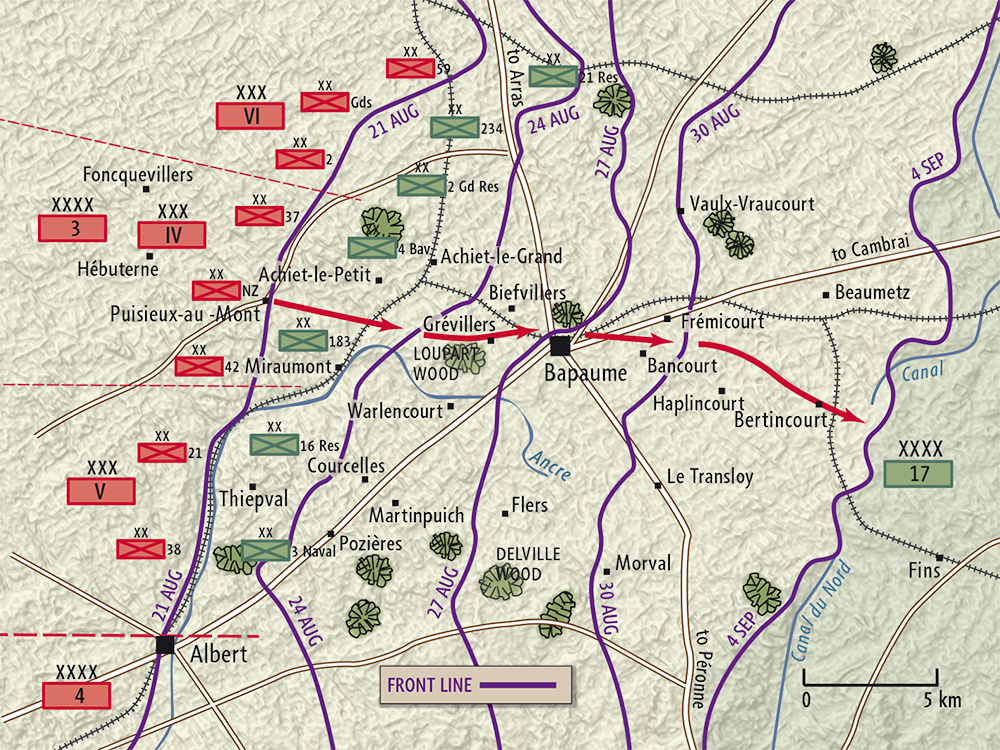
Battle of Bapaume map (Geographx)
With the Germans now clearly on the defensive, the Allies looked to maintain the pressure with a series of fresh offensives. On 21 August, the British Third Army (including the New Zealand Division) attacked along a 15-km front north of Amiens, pushing back the German line and driving toward Bapaume. The New Zealand Division played a support role for the first few days of the battle, then moved into the vanguard of IV Corps’ advance. On 24 August it captured Grévillers, Loupart Wood and Biefvillers. Operating now in ground that had not been shelled, with villages, farms and forests largely intact, the New Zealanders revelled, and excelled, in the new conditions of open warfare.
Three VC winners
Samuel Forsyth, Reginald Judson and John (Jack) Grant were all awarded the Victoria Cross for separate actions over nine days during the fighting around Biefvillers (Forsyth, 24 August), Bapaume (Judson, 25 August), and Bancourt (Grant, 1 September). All three were cited for their bravery in attacking German machine-gun posts, amongst other courageous acts.
On 25 August, the New Zealand Division attacked again in an attempt to outflank Bapaume, but the defenders held firm in the town. Losses mounted. Not until the night of 28/29 August did the enemy finally pull out, slipping away to new positions a few kilometres to the east. New Zealand troops entered Bapaume next morning, then pushed east through the villages of Frémicourt and Bancourt. After clearing strong German positions on Bancourt Ridge, they advanced another 6 km before halting near Bertincourt to regroup. The Battle of Bapaume was over.
By early September, the British First, Third and Fourth armies had pushed the German forces on the Somme back to the Hindenburg Line. The point where the German Army had launched its spring offensive in March was now its last major line of defence on the Western Front.
The Hundred Days’ Offensive
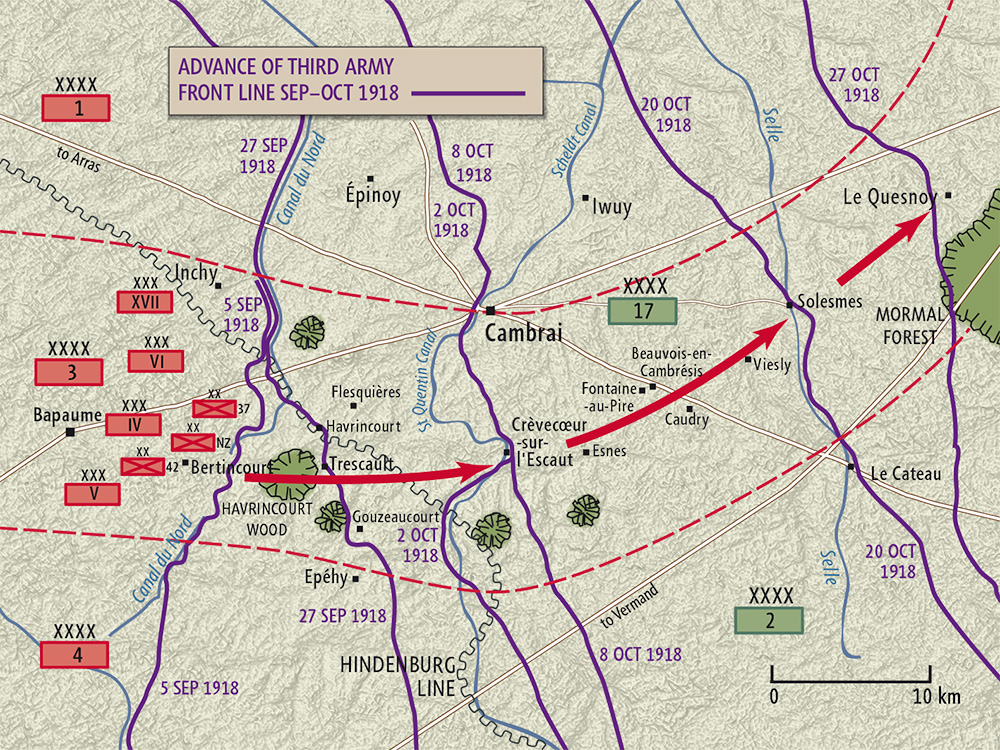
Advance to victory 1918 map (Geographx)
As the Third Army followed the retreating Germans, the New Zealand Division mopped up a succession of rearguards. They fought their way through Havrincourt Forest and Gouzeaucourt Wood before reaching Trescault Ridge. This position was part of a chain of enemy outposts and strongpoints screening the Hindenburg Line, just 4 km to the east.
On 12 September, the Third Army attempted to overwhelm the German positions along Trescault Ridge, capturing the villages of Havrincourt and Trescault and some of the high ground during the Battle of Havrincourt (12–14 September). The New Zealand Division, weakened from its efforts at Bapaume, struggled to advance on Trescault Spur, an offshoot of the main ridge defended by elite troops. After two days of bloody fighting the New Zealanders were relieved and moved back to Bapaume to rest.
In late September, the Allies launched a massive offensive against the Hindenburg Line, attacking simultaneously along more than half of the Western Front. On the 26th, American and French forces struck in the Meuse-Argonne region in the north-east. The next day, the British First and Third armies pushed toward the city of Cambrai, capturing 10,000 prisoners and 200 field guns. In Flanders, the British Second Army and the Belgian Army punched through German defences near Ypres on 28 September, advancing up to 9 km in 24 hours – more ground than was taken in three months of fighting at Passchendaele in 1917. Back on the Somme, the British Fourth Army attacked the central sector of the Hindenburg Line on 29 September, crossing the St Quentin Canal and penetrating German support lines.
Stunned by the scale and ferocity of the Allied offensive, the German high command implored the Kaiser to seek an immediate armistice to allow their troops to withdraw to Germany and regroup. On 4 October, the German government asked the Americans to broker a ceasefire.
The New Zealand Division came out of reserve for the final phases of the Battle of the Canal du Nord (27 September–1 October). Fighting their way through the main Hindenburg Line, the 1st New Zealand Infantry Brigade seized the town of Crèvecoeur on the final day of the battle, establishing a valuable foothold across the Scheldt (Escaut) Canal in the process. In effect, the New Zealanders had already broken through the ‘Masnières–Beaurevoir line’, a trench system prepared hastily behind the Hindenburg Line on which the Germans hoped to hold the Allied advance in this sector.
After pausing to regroup, the British Third and Fourth armies renewed their attack on 8 October. Breaking through weak German defences, the New Zealand Division advanced more than 5 km to take the village of Esnes, capturing more than 1000 prisoners and a dozen field guns along the way. The 800 New Zealand casualties included 150 dead. That night German forces withdrew to the Selle River, allowing Canadian troops to take Cambrai unopposed. Further south, the New Zealanders continued the pursuit for 18 km to the river, seizing an important bridgehead at Briastre before being relieved on 14 October.
A week later, the division returned to the fray, taking part in the closing stages of the Battle of the Selle (17–25 October). It advanced to within a kilometre of the old fortress town of Le Quesnoy, which was encircled by elaborate and historic brick ramparts. During this attack, New Zealand lost one of its most courageous soldiers. Victoria Cross recipient Sergeant Henry James Nicholas was killed in action near Beaudignies, 4 km west of Le Quesnoy, on 23 October. He is buried in nearby Vertnigneul Churchyard.
Le Quesnoy
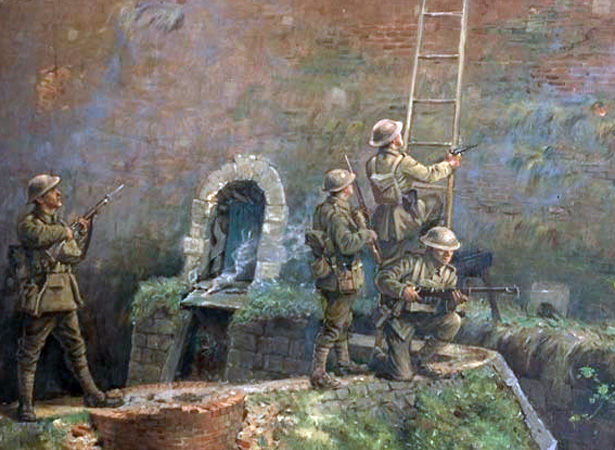
Capture of Le Quesnoy by George Edmund Butler, 1920 (ANZ, AAAC898 NCWA 535)
On 4 November, against faltering opposition, the British First, Third and Fourth armies launched a major offensive (later designated the Battle of the Sambre). It would prove to be the final attack of the war. On the opening day, the New Zealand Division captured 2000 prisoners and 60 field guns and advanced to the edge of the Mormal Forest. Le Quesnoy fell the same day after soldiers from the 4th Battalion, New Zealand Rifle Brigade, scaled the walls with a ladder.
Curly Blyth
The area around Le Quesnoy maintains a strong affinity with New Zealand. In 2000, the village of Beaudignies renamed its square ‘Place du Colonel Blyth’ in honour of Lieutenant-Colonel Lawrence (Curly) Blyth, whose unit captured ground in the area during the New Zealand Division's final opeartions. One of the last New Zealand veterans of the First World War, he died in 2001, aged 105.
The old fortress town of Le Quesnoy had been in German hands since 1914, and several thousand German troops were still inside it when the New Zealanders attacked. Heavy artillery could have rapidly demolished the walls of Le Quesnoy, but at heavy cost to the inhabitants. No such attack was contemplated – the plan was for the 3rd New Zealand (Rifle) Brigade to bypass the town and isolate the enemy forces there.
Although their orders did not provide for an immediate assault on the town, the New Zealand riflemen were determined to capture it. A little competition between the 2nd and 4th Battalions developed after the encirclement was complete; the former advanced on the town in the direction of the Valenciennes Gate, while the latter pressed forward through the outer defences from the west. The German defenders were demoralised, but their officers were not prepared to surrender without a fight.
This set the stage for one of the New Zealand Division’s most spectacular exploits of the war. When a section of the 4th Battalion reached the inner walls about midday on 4 November, they had already scaled the complex network of outer ramparts with ladders supplied by the field engineers. But because of the height of the inner wall, the riflemen could only position a ladder on a narrow ledge atop a sluice gate. Led by Lieutenant Leslie Averill, the battalion’s intelligence officer, a small group of men quickly climbed up the wall. The whole battalion followed. After exchanging shots with fleeing Germans, the New Zealanders entered the town. The garrison quickly surrendered.
[Leslie] Averill and [Harold] Kerr were already working along the tree-covered bank to the edge of the inner moat. They picked up the ladder, and stepping on the knife-edge bridge in single file reached the sluice-gate. The whole place was ominously still but for the low gurgle of water in the moat below them… Quietly they raised the ladder against the wall. It reached the top of the bricks with a foot to spare, resting against a 2-foot high grassy bank which crowned the rampart… Averill started to mount it, telling the others that he would shout down to them from the top if all was quiet. It was now about 4 p.m. Averill quickly reached the top of the brick-work, and stepped over the coping on to the grassy bank. Crouching behind it, he peered over. It was one of the most dramatic moments in the Division’s history. There was an instant crashing through some brushwood on the far side, and Averill saw 2 Germans of the bombing post running off panic-stricken. He sent a revolver bullet after them. Kerr was now on the topmost rung. The 2 officers could see a pair of machine guns on the salient on their right pointing into the moat but abandoned. They stood up and walked over the top of the grass slope and down the other side towards the boulevard. They were greeted by a great jabbering of German. Kerr fired a shot at the man who appeared to be leader, but missed. The whole enemy party bolted at once into an underground cavern under the rampart.
Colonel Hugh Stewart, The New Zealand Division 1916–1919: a popular history based on official records, Whitcombe & Tombs, Auckland, 1921, pp. 591–2
This was the last significant action of the war for the New Zealanders. During 5 November they pushed through the Mormal Forest north-east of Le Quesnoy. That night the division was relieved. The New Zealand gunners remained in action in support of British units for a few days before heading back into reserve on the 9th. Two days later, the fighting ended. The last New Zealanders in action had been the mounted riflemen and cyclists serving in XXII Corps, which, after helping to capture Valenciennes, had reached Mons when the guns fell silent.
Abandoned by its allies – Bulgaria, the Austro–Hungarian Empire and the Ottoman Empire had all ceased hostilities – its population suffering heavily from the effects of the Allied blockade and its armies in disarray, Germany accepted defeat. An armistice on the Western Front came into effect at 11 a.m. on 11 November 1918.
Armistice and occupation of Germany

Armistice and occupation of Germany map (Geographx)
The conditions of the armistice gave the Germans 14 days to leave all occupied territory and 28 days to withdraw across the River Rhine. The Allies also insisted on sending their armies into Germany to occupy bridgeheads around the cities of Cologne, Coblenz and Mainz. British forces occupied the Cologne area, while the Americans and French took control of Coblenz and Mainz respectively.
Sent to join the British occupation force, the New Zealand Division marched 240 km through France and Belgium in December, reaching the German border on 19 December. Led by 1st Battalion, Canterbury Regiment, the infantry entered Cologne the next day, followed on Boxing Day by the artillery and other horse-borne units.
Trouble at Sling
In mid-March 1919, hundreds of bored New Zealand and Australian soldiers rioted at Sling Camp in England. Enraged at repeated delays in scheduled troopship departures, bias in decisions about sending men home, pointless guard duty and lack of leave, the men looted stores – especially alcohol and cigarettes – and trashed officers’ messes. The total damage was said to amount to about £10,000, or $1 million in today’s money. Read more.
The New Zealanders’ role as occupiers was short-lived. Once it became clear that Germany could not resume the fight, attention turned to demobilising the troops and getting them home. Beginning in late December, married men and those who had enlisted in 1914–15 were sent back to England and from there to New Zealand. The process sped up from January 1919, with 700–1000 men leaving each week. On 25 March 1919, the last New Zealand soldiers left Cologne and the New Zealand Division was officially disbanded. After nearly three years’ service and at a cost of more than 12,000 lives, the New Zealand Expeditionary Force’s campaign on the Western Front was over. With perhaps 500 New Zealanders falling while serving in imperial units, including the air forces, New Zealand’s death toll during the four-year Western Front struggle approached 13,000.
Further information
Originally written and produced by Gareth Phipps in 2014, this article was revised by Ian McGibbon in 2017.
Links
- Western Front, 1918 (Te Ara)
- Road to Le Quesnoy (Nga Tapuwae)
Books
- J. Crawford and I. McGibbon (eds), New Zealand's Great War: New Zealand, the Allies and the First World War, Exisle Publishing, Auckland, 2007
- D. Fenton, New Zealand and the First World War, Penguin, Auckland, 2013
- G. Harper, Dark Journey: three key New Zealand battles of the Western Front, HarperCollins, Auckland, 2007
- I. McGibbon, New Zealand’s Western Front campaign, Bateman, Auckland, 2016
- I. McGibbon (ed.), The Oxford companion to New Zealand military history, Oxford University Press, Auckland, 2000
- I. McGibbon, The Western Front: a guide to New Zealand battlefields and memorials, Penguin Books, Auckland, 2015
- H. Stewart, New Zealand Division, 1916–1919: a popular history based on official records, Whitcombe & Tombs, Wellington, 1921

