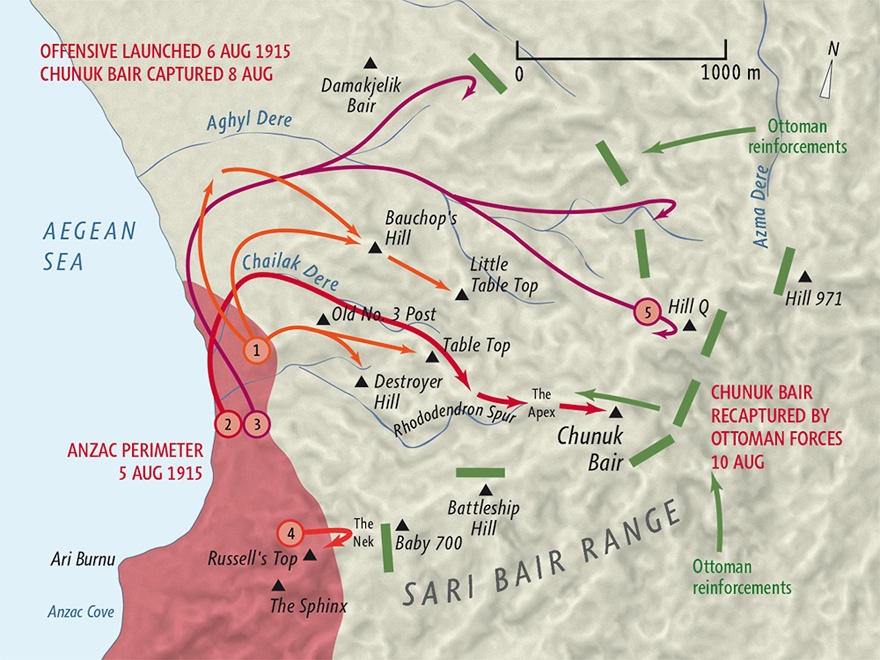
You can also download a hi-res copy as a pdf (1.3 mbs).
With a stalemate at Helles, the Allies launched the Sari Bair Offensive in August 1915 to break through the Ottoman lines at Anzac and seize the heights of the Sari Bair Range.
The offensive began on 6 August with diversionary attacks at Lone Pine, at the southern end of the Anzac perimeter, and Helles. That evening, two covering forces moved out from the Anzac perimeter to capture the foothills up which two assault columns would move on their way to seize Chunuk Bair, Hill Q and Hill 971.
On the right, New Zealand Mounted Rifles units and the Native Contingent seized Old No. 3 Post, Table Top, Destroyer Hill, Bauchop’s Hill and Little Table Top (indicated by the orange arrows from no. 1). On the left, a combined Australian, British and Indian force headed northwards to secure Damakjelik Bair, Hill 971 and Hill Q (indicated by the purple arrows from no. 3).
The plan came unstuck. The left assaulting column got lost moving up a rugged valley (Aghyl Dere) and failed to rendezvous with the column on the right (indicated by the red arrow from no. 2) at Rhododendron Spur. It was daylight on 7 August before the troops were ready to move; by then the Ottomans had reinforced their defences on Chunuk Bair (indicated by the green blocks and arrows).
Across the valley, the 3rd Australian Light Horse Brigade launched an attack at The Nek (indicated by the red arrow from no. 4), losing more than 200 men killed in a forlorn attempt to divert Ottoman attention away from Chunuk Bair.
The Wellington Battalion finally reached the summit of Chunuk Bair in the early hours of 8 August. They found it unoccupied – the defenders had withdrawn during the night. It was not long before the Ottomans sent troops to retake the position. New Zealand and British units managed to hold the summit until 10 August, when a massive Ottoman attack swept them off Chunuk Bair.
British forces on the approaches to Hill Q were also driven back. A lone Gurkha battalion reached the top of Hill Q (indicated by no. 5) on 9 August, but was unable to consolidate its position.
By mid-August, the British and ANZAC forces had abandoned the exposed forward positions they had won at great cost in order to establish a defensible new perimeter. The Sari Bair Offensive had failed.

Community contributions